MeraForum Community.No 1 Pakistani Forum Community

| Adobe photoshop !! Adobe photo shop lectures !! |
| Advertisement |

 |
|
|
Thread Tools | Display Modes |
|
(#1)


|
|
||||
 Show Printable Version Show Printable Version
 Email this Page
08-12-2008, 03:28 AM Email this Page
08-12-2008, 03:28 AM
You can hand colour a black and white photograph in Photoshop in a number of ways. In this tutorial, I’m looking at how to add colour by making selections and using adjustment layers. Let me preface this by saying, THIS EFFECT DOES NOT LOOK NATURAL! It will not look like a colour photograph, but is great for a retro look and can be good fun on old pictures. However, nobody will mistake it for an original colour picture. Step 1 Open up a black and white photo. I’m using this image from “Vertigo” by Alfred Hitchcock. I got it from movieweb.com which is a good source of high resolution movie stills. 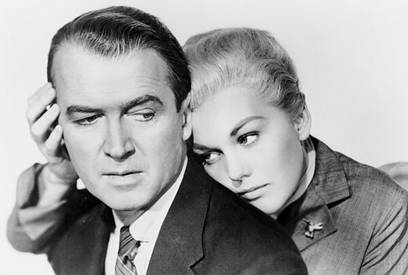 Step 2 Choose Image > Mode > RGB to change the photo from greyscale to RGB colour mode. Now we’re going to select different parts of the image and paste them onto new individual layers. The quick mask is helpful here. Step 3 Select the Quick Mask (Q) and choose a suitable brush size. Start painting on any area of skin in the pic. Painting with black will cover an area in pink-red, this is the part that will be selected. 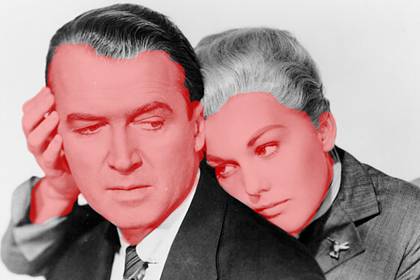 Step 4 Make sure to leave the eyes out of the selection. If you’ve included them, just change the brush foreground colour to white and paint them out of the selection. You can do this anywhere you’ve made a mistake and “gone outside the lines”. 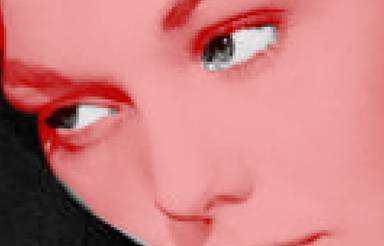 Step 5 When you’re happy that you have only the skin area selected (no clothes, no eyes, no background!), press Q again to switch from Quick Mask mode back to Normal mode. You will see that the areas you painted in black are now selected. We need to invert this selection now so choose Shift + Ctrl + I (win) or Shift + Cmd + I (mac) to do so. Step 6 Copy the selection by pressing Ctrl + C (win) or Cmd + C (mac). Step 7 Paste the selection back in by pressing Ctrl + V (win) or Cmd + V (mac). This will paste the Skin selection into a new layer. Rename the layer in the layers palette (by double-clicking on it’s current name – Layer 1) and call it something like, ehm, Skin. 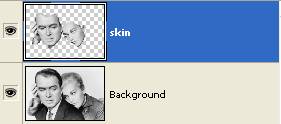 Step 8 Now repeat steps 3 to 7, so that you have layers for hair, jackets (I did male and female as separate layers), wallpaper and whatever other sections you want to colour in. Your layers palette should end up looking something like this; 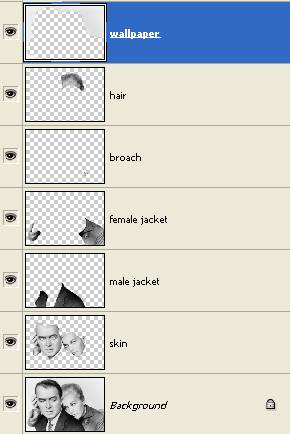 Step 9 Now that each part has been isolated, we can start colouring! Step 10 Click on the skin layer to select it. Choose Layer > New Adjustment > Layer > Color Balance. I’ve named the new adjustment layer “skin” and also hit the checkbox “Use previous layer to create clipping mask” so that a checkmark appears in the box. Click ok. 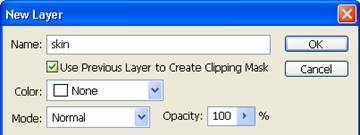 Step 11 Now the Color Balance dialog box opens and here you can decide what kind of colours you want to set up. If you’re going for an alien look, you might want to give your subject green or blue skin. For my image I used the following settings: Shadows: +81 -8 -31 Midtones: +12 -7 -17 Highlights: +8 +4 -9 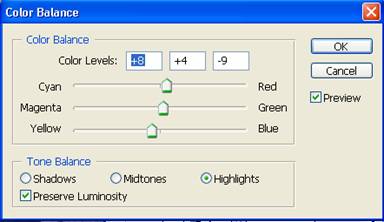 Click OK and you will have set up an adjustment layer that doesn’t alter the pixels in your original image. To go back and change any settings, double click on the thumbnail with the shapes in it. 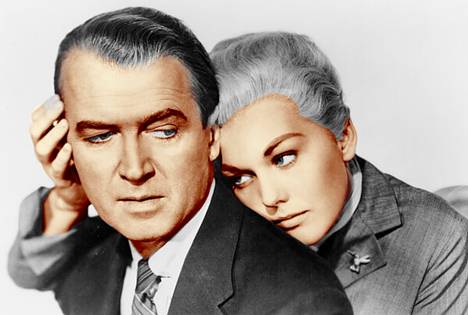 Looks freakishly cool already! Step 12 Repeat steps 10 and 11 for every part of the image that you have isolated, setting up adjustment layers and colours as you go. My final image looked like this: 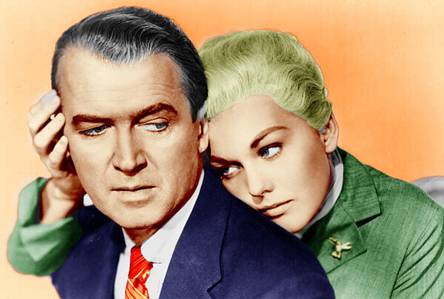 It’s worth spending a bit of time getting your initial selections right, then it’s easy to pick and choose colours with the adjustment layers.


|
| Sponsored Links |
|
|
|
(#2)
|
|
|||
|
thxx
[SIGPIC][/SIGPIC]]
|
|
(#3)
|
|
||||
|
Gr8
  
|
|
(#4)
|
|
||||
|
Thanks for sharing  . .
|
|
(#5)
|
|
||||
|
Thanks for sharin mujey tu pata hi nahi tha
|
|
(#6)
|
|
|||
|
hahah thas awesome!! great tutoriol thx 4 sharin
|
|
(#7)
|
|
||||
|
nice sharing sis
 Main bhi kitni pagal hoon na Sang hawa k urna chahoon Titli ban kar nagri nagri Gulshan Gulshan phirna chahoon Phooloon k sab rang chura kar Chunri apni rangna chahoon Main bhi kitni pagal hoon na
|
|
(#8)
|
|
|||
|
very nice sharin
[SIGPIC][/SIGPIC]
|
|
(#9)
|
|
|||
|
Show Printable Version
Email this Page
09-03-2009, 05:39 PM
good..
|
|
(#10)
|
|
|||
|
Show Printable Version
Email this Page
09-06-2009, 10:00 AM
very nice
|
|
|
| Bookmarks |
| Tags |
| black, colouring, hand, photo, photoshop, white |
|
|


 Linear Mode
